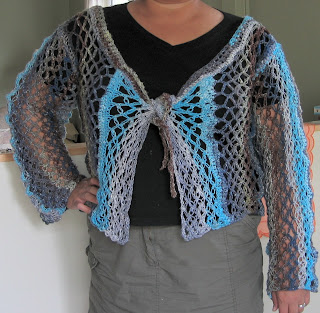
Self-portraits - or, why I am not a model
Ok, first of all, I did not run out of yarn for my jacket, which I have named the Unwilling Noro Project. I managed to salvage every single scrap of yarn I had left and finished the whole thing, including the border at the neck. I think it looks pretty good, for something I just threw together. The neck and back could be narrower, but meh, it's done, and I'm fairly happy with it. I just have never found a yarn that was so unwilling to be made into anything, hence the name.
One of the most difficult problems I have is taking photographs of myself wearing my projects. I'm always disappointed by what I look like. I think I have this filter over my eyes that makes me think I look better than I actually do, as most women do. Case in point, the taking of these pictures.
I originally took pictures of this project in the bathroom. I thought, hey, I have a mirror, I can put the camera in front of it so that I can see the display in the mirror, position myself accordingly, and bada bing, bada boom, photos of me!
The weird thing was, even though I could see myself in the mirror, the resulting photos were NOTHING like I thought I looked like. And well, the lighting wasn't good for the colours in the jacket, so, back to the drawing board for moi.
You might wonder how I'm taking this photos without assistance. The secret? The Quick Pod.
Please excuse the junk in the background. The dining table is doomed to be my junk repository.
Anyway, I purchased this handy-dandy little tripod at the local IGA for the low price of $16.99, and have found it extremely useful ever since. The original purpose was to take photos for my (now closed) Etsy jewelry shop. I find it ever so useful to take all the natural-light photos of anything I make with minimal wobble. I set my camera up on it, set the timer and let it go, and voila: clear photos!
The Quick Pod shrinks down into a nice, compact set of pieces, and comes in with a little carrying bag.

The little chrome telescopic legs are removable, and the telescopic "neck" can be adjusted to two heights, which comes in handy for those times when you are standing in front of the Eiffel Tower and have no one to take your photo (I dunno, this was the example that came with the instructions). If you want, you can hold it out in front of you to take pictures, or set it on the table.
Here are the photos I took of myself with this gadget. I thought they turned out pretty darn ok.


In other news (dude, it's news for me), I swatched for a new project today: Sweater Babe's Chic Cables and Lace Cowl Neck for my mom. It calls for size 10 3/4 needles. I have 10 1/2 and 11. Figures. Luckily, I'm getting gauge with size 11 (or 8 mm). I also took some advice and blocked the swatch with some hair conditioner, which has softened the wool considerably. I'm sure there are folks out there who would disagree with my choice of softener, but I think I'll stick with this for now, and then buy some Eucalan or Soak so that my mom can wash this sweater without having to worry.
I also balled a skein of Cascade 220 in burgandy. My friend Lisa says balling wool is relaxing for her. Well, it started out that way, until I got tangled up like a cat on catnip in a wool shop. Luckily, it only took me an hour to escape! I'm going to swatch for another project with this - a sweater that Sears had in their catalogue that does not come in my rather substantial size. I'm going to create the pattern a la Elizabeth Zimmerman and knit it from the bottom up - at least, that's the plan. We'll see what comes of the swatch.
Onwards and upwards!
Comments
The cardigan is basically made up of a rectangle for the back, two rectangles for the sleeves, and two trapezoids in the fronts. Try out crocheting a rectangle using this stitch, and once you get the feel of it, you can experiment with making the fronts. I'm afraid I can't really remember how I did the fronts, just that it was a lot of trial and error!